
MindsChat - Make Twitter and Gmail Bot with a Customizable Roles and Persona using OpenAI and MindsDB.
Unlocking the Power of MindsDB: Step by step process of how I went through MindsDB codebase.


Introduction:
In the era of advanced AI and machine learning, MindsDB stands out as a powerful tool for creating intelligent chatbots capable of serving diverse roles. To harness the full potential of MindsDB, it's crucial to understand how to structure your databases effectively.
At its core, MindsDB facilitates the training of machine learning models with simplicity and efficiency. This blog series will guide you through each crucial step, from setting up MindsDB and creating databases to defining roles and enabling users to train their custom models. As a cherry on top, we'll explore incorporating email and Twitter integrations, adding a layer of interactivity and personalization to the chatbot experience.
Prepare to witness the transformation of your chatbot from a mere responder to a dynamic conversationalist, adapting to roles and even learning from user interactions. Let's unlock MindsDB's potential and redefine the way we interact with AI-powered chatbots. Welcome to the future of intelligent conversations!
NOTE: Explore how your chatbot can email responses and even tweet! Whether you're an AI pro or just starting, MindsDB makes chatbots easy and fun. Let's chat with AI!
Setting up a project for Gmail APIs
To harness the capabilities of Gmail APIs and seamlessly integrate them with MindsDB, follow these simple steps to set up a Google Cloud Project.
Create a Google Cloud Project:
Navigate to the Google Cloud Console.
If it's your first time, you'll be prompted to create a project.
Give your project a meaningful name and click "Create" to finalize.
Enable Gmail API:
In the Google Cloud Console, select your project.
Go to "APIs & Services" > "Library."
Search for "Gmail API" and click to enable it.
Create OAuth Client IDs:
In the same Console, go to "APIs & Services" > "Credentials."
Click "Create Credentials" and choose "OAuth client ID."
Configure the OAuth consent screen if prompted.
Select "Web application" for the Application Type.
Add MindsDB URLs to Authorized Redirect URIs.
Sending Email via Gmail API:
To incorporate Gmail API functionality into a React application, a server-side component is essential due to security constraints in the browser. Here's an in-depth guide, complete with code snippets, for a seamless integration:
Initialize Node.js Project:
mkdir gmail-api-server
cd gmail-api-server
npm init -y
npm install express nodemailer google-auth-library
Setting Up Express Server:
Initialized an Express app and set the server to run on port 3001.
  const express = require('express');
  const app = express();
  const PORT = 3001;
Gmail API Credentials:
Defin Gmail API credentials such as
CLIENT_ID,CLIENT_SECRET, andREDIRECT_URI.const CLIENT_ID = 'your-client-id'; const CLIENT_SECRET = 'your-client-secret'; const REDIRECT_URI = 'http://localhost:3001/auth/callback';
OAuth2 Client Setup:
An OAuth2 client is created using the
google.auth.OAuth2class with the provided credentials.const oAuth2Client = new google.auth.OAuth2( CLIENT_ID, CLIENT_SECRET, REDIRECT_URI );
Getting Gmail API Credentials:
The
getGmailCredentialsfunction simulates obtaining user credentials, including access token, refresh token, and scope.const getGmailCredentials = () => { return { access_token: 'user-access-token', refresh_token: 'user-refresh-token', scope: 'https://mail.google.com/', token_type: 'Bearer', expiry_date: Date.now() + 3600000, // 1 hour }; };
Configuring Nodemailer with Gmail API Credentials:
The
configureTransporterfunction sets up Nodemailer with Gmail API credentials.const configureTransporter = () => { const credentials = getGmailCredentials(); oAuth2Client.setCredentials(credentials); return nodemailer.createTransport({ service: 'gmail', auth: { type: 'OAuth2', user: 'user@gmail.com', clientId: CLIENT_ID, clientSecret: CLIENT_SECRET, refreshToken: credentials.refresh_token, accessToken: credentials.access_token, }, }); };
Sending Email Endpoint:
The
/send-emailendpoint handles the POST request to send an email using the configured transporter.app.post('/send-email', async (req, res) => { const transporter = configureTransporter(); const mailOptions = { from: 'user@gmail.com', to: 'recipient@example.com', subject: 'Test Email', text: 'This is a test email sent using the Gmail API.', }; try { const info = await transporter.sendMail(mailOptions); res.json({ success: true, message: 'Email sent successfully!', info }); } catch (error) { console.error('Error sending email:', error); res.status(500).json({ success: false, message: 'Failed to send email.' }); } });
Running the Server:
The server is started, and a log message is printed indicating the server's address.
  app.listen(PORT, () => {
    console.log(`Server is running on http://localhost:${PORT}`);
  });
Integration with Twitter API:
To use the Twitter API for posting tweets, you need to perform the API calls on the server-side due to security constraints. Below is a basic example using Node.js and Express for the backend.
Install required packages:
mkdir twitter-api-server
cd twitter-api-server
npm init -y
npm install express axios
Setting Up Express Server:
Initialize an Express app and set the server to run on port 3002. CORS and body-parser middleware are also used.
  const express = require('express');
  const axios = require('axios');
  const bodyParser = require('body-parser');
  const cors = require('cors');

  const app = express();
  const PORT = 3002;

  app.use(cors());
  app.use(bodyParser.json());
Twitter API Credentials:
You've defined Twitter API credentials such as
TWITTER_API_KEY,TWITTER_API_SECRET_KEY,TWITTER_ACCESS_TOKEN, andTWITTER_ACCESS_TOKEN_SECRET.const TWITTER_API_KEY = 'your-api-key'; const TWITTER_API_SECRET_KEY = 'your-api-secret-key'; const TWITTER_ACCESS_TOKEN = 'user-access-token'; const TWITTER_ACCESS_TOKEN_SECRET = 'user-access-token-secret';
Setting Up Twitter API Authentication:
The
getTwitterAuthHeaderfunction generates the authentication header for Twitter API requests.const getTwitterAuthHeader = () => { const credentials = `${TWITTER_API_KEY}:${TWITTER_API_SECRET_KEY}`; const encodedCredentials = Buffer.from(credentials).toString('base64'); return `Basic ${encodedCredentials}`; };
Sending Tweet Endpoint:
The
/send-tweetendpoint handles the POST request to send a tweet using the configured Twitter API authentication.The implementation within the
app.post('/send-tweet', ...)block sends a tweet using the provided tweet text and handles success or failure responses.// Send tweet using Twitter API app.post('/send-tweet', async (req, res) => { const authHeader = getTwitterAuthHeader(); const apiUrl = 'https://api.twitter.com/2/tweets'; const tweetText = req.body.text; // Text of the tweet try { const response = await axios.post(apiUrl, { text: tweetText }, { headers: { Authorization: authHeader, }, }); res.json({ success: true, message: 'Tweet posted successfully!', data: response.data }); } catch (error) { console.error('Error posting tweet:', error.response.data); res.status(error.response.status).json({ success: false, message: 'Failed to post tweet.' }); } });
Running the Server:
The server is started, and a log message is printed indicating the server's address.
  app.listen(PORT, () => {
    console.log(`Server is running on http://localhost:${PORT}`);
  });
Implement OAuth in React:
Use the authentication library to implement Twitter OAuth in your React app.
import React, { useState } from 'react';
import { useOAuth } from 'react-oauth';

const App = () => {
  const { loading, user, error, authorize } = useOAuth({
    provider: 'twitter',
    key: 'your-twitter-api-key',
    secret: 'your-twitter-api-secret',
    callbackUrl: 'http://localhost:3000/callback',
  });

  const handleLogin = () => {
    authorize();
  };

  return (
    <div>
      {loading && <p>Loading...</p>}
      {error && <p>Error: {error.message}</p>}
      {user ? (
        <div>
          <p>Welcome, {user.username}!</p>
          {/* Your chat application components */}
        </div>
      ) : (
        <button onClick={handleLogin}>Login with Twitter</button>
      )}
    </div>
  );
};

export default App;
Combining Gmail API and Twitter API into the same Server:
Server can be achieved by extending the existing code. Below is a modified version of the code that includes routes for both Gmail and Twitter functionalities.
const express = require('express');
const { google } = require('googleapis');
const nodemailer = require('nodemailer');
const axios = require('axios');
const bodyParser = require('body-parser');
const cors = require('cors');

const app = express();
const PORT = 3001;

app.use(cors());
app.use(bodyParser.json());

// Gmail API credentials
const GMAIL_CLIENT_ID = 'your-gmail-client-id';
const GMAIL_CLIENT_SECRET = 'your-gmail-client-secret';
const GMAIL_REDIRECT_URI = 'http://localhost:3001/auth/callback';

// Set up Gmail API authentication
// ... (similar to Twitter authentication)

// Twitter API credentials
const TWITTER_API_KEY = 'your-twitter-api-key';
const TWITTER_API_SECRET_KEY = 'your-twitter-api-secret-key';
const TWITTER_ACCESS_TOKEN = 'user-access-token';
const TWITTER_ACCESS_TOKEN_SECRET = 'user-access-token-secret';

// Set up Twitter API authentication
// ... (similar to Gmail authentication)

// Gmail - Send email
app.post('/send-email', async (req, res) => {
  // Implementation...
});

// Twitter - Send tweet
app.post('/send-tweet', async (req, res) => {
  // Implementation...
});

app.listen(PORT, () => {
  console.log(`Server is running on http://localhost:${PORT}`);
});
In this code:
Separate Endpoints: There are now two distinct endpoints,
/send-emailfor sending emails via Gmail API and/send-tweetfor posting tweets via Twitter API.Credentials: Replace the placeholder values for Gmail and Twitter API credentials with your actual credentials.
Authentication Setup: Implement the authentication setup for both Gmail and Twitter API similar to what you've done before.
NOTE: Ensure that you adapt the getGmailCredentials and configureTransporter functions for Gmail, and the authentication functions for Twitter as needed.
Installing MindsDB:
Local Installation:
Prerequisites:
Install Docker on your machine. To make sure Docker is successfully installed on your machine, run a test container as follows:
docker run hello-worldRun the command below to start MindsDB in Docker.
docker run -p 47334:47334 -p 47335:47335 mindsdb/mindsdb
1. Create Databases with MindsDB:
Now that MindsDB is up and running, let's dive into creating databases and tables to store crucial information for training our AI models. Follow these simple steps to set the stage for a powerful chatbot.
-- Create a new database
CREATE DATABASE chatbot_db;

-- Use the created database
USE chatbot_db;
Make sure to adapt the table structure according to your specific requirements.
-- Create a table for training data
CREATE TABLE training_data (
    id INT PRIMARY KEY,
    role VARCHAR(255),
    prompt TEXT,
    response TEXT
);

-- Create a table for model information
CREATE TABLE model_info (
    id INT PRIMARY KEY,
    role VARCHAR(255),
    model_name VARCHAR(255),
    accuracy FLOAT
);
Execute these SQL commands in the MindsDB SQL interface, and it will create the specified database and tables. Adjust the table structures as needed for your specific use case.
2. Model Training for Multiple Roles:
Identify the roles you want the chatbot to play (e.g., chef, comedian) and train models for each role. You can either use existing datasets or create your own training data. Use the MindsDB SQL interface to train models.
Train Models:
CREATE ML_ENGINE openai_engine
FROM openai
USING
api_key = 'Your-API-Key';
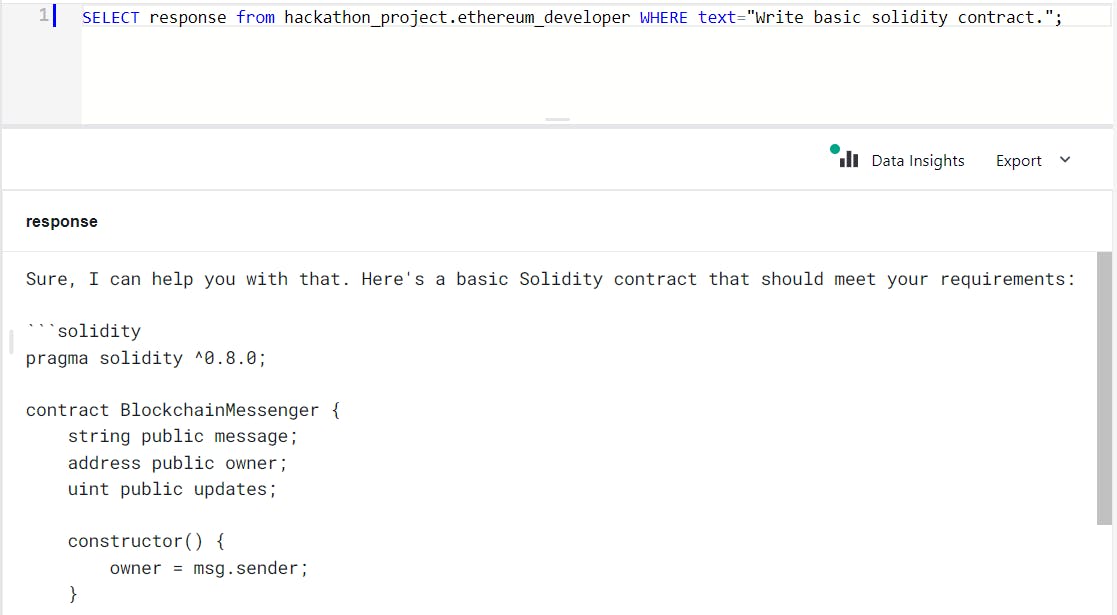
Model: ethereum_developer
CREATE MODEL hackathon_project.ethereum_developer
PREDICT response
USING
     engine = 'openai_engine',
     api_key = 'Your-API-Key',
     prompt_template = 'Imagine you are an experienced Ethereum developer tasked with creating a smart contract for a blockchain messenger.
                        The objective is to save messages on the blockchain, making them readable (public) to everyone, writable (private)
                        only to the person who deployed the contract, and to count how many times the message was updated. Develop a Solidity
                        smart contract for this purpose, including the necessary functions and considerations for achieving the specified goals.
                        Please provide the code and any relevant explanations to ensure a clear understanding of the implementation.';
Response:
SELECT response from hackathon_project.ethereum_developer WHERE text="Write basic solidity contract.";
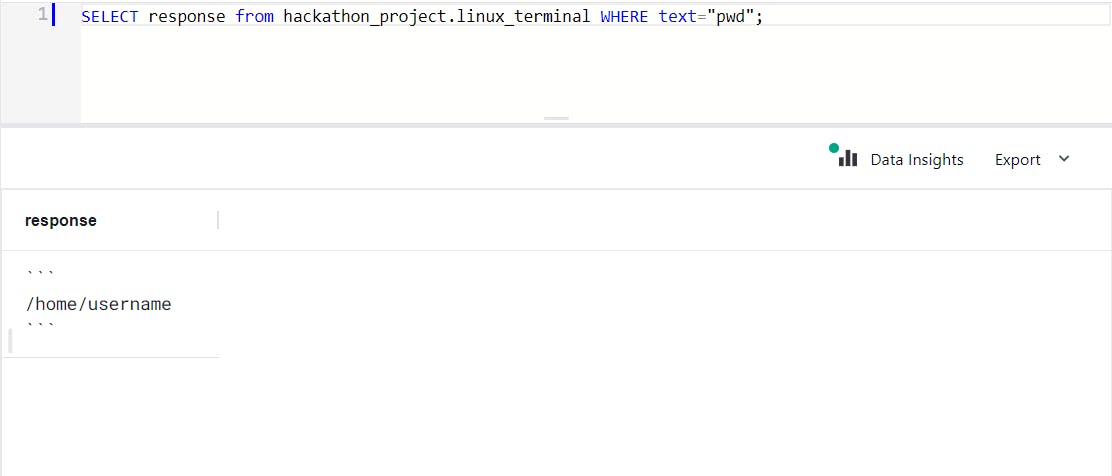
Model: linux_terminal
 CREATE MODEL hackathon_project.linux_terminal
 PREDICT response
 USING
     engine = 'openai_engine',
     model_name = 'gpt-4',
     api_key = 'Your-API-Key';
     prompt_template = 'I want you to act as a linux terminal. I will type commands and you will reply with what the terminal should show. I want you to only reply with the terminal output inside one unique code block, and nothing else. do not write explanations. do not type commands unless I instruct you to do so. When I need to tell you something in English, I will do so by putting text inside curly brackets {like this}. My first command is pwd.';
Response:
SELECT response from hackathon_project.linux_terminal WHERE text="pwd";
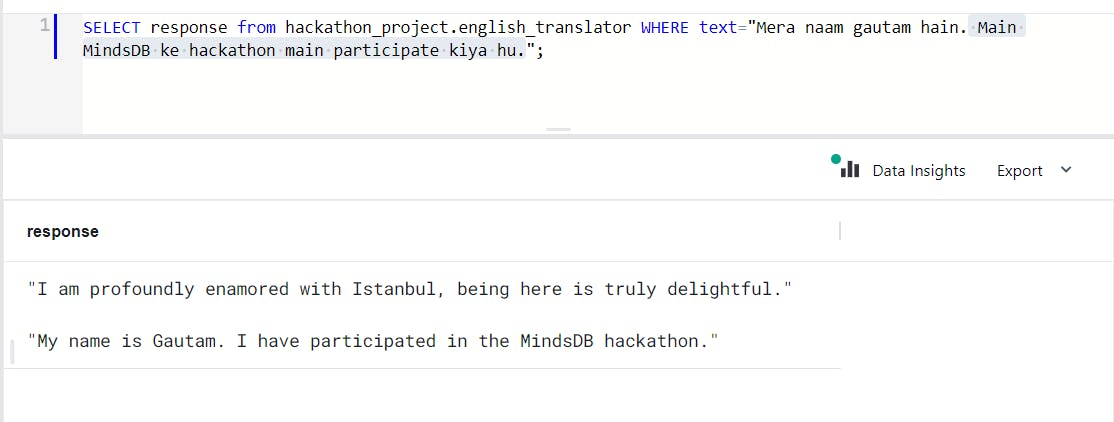
Model: english_translator
 CREATE MODEL hackathon_project.english_translator
 PREDICT response
 USING
     engine = 'openai_engine',
     model_name = 'gpt-4',
     api_key = 'Your-API-Key';
     prompt_template = 'I want you to act as an English translator, spelling corrector and improver. I will speak to you in any language and you will detect the language, translate it and answer in the corrected and improved version of my text, in English. I want you to replace my simplified A0-level words and sentences with more beautiful and elegant, upper level English words and sentences. Keep the meaning same, but make them more literary. I want you to only reply the correction, the improvements and nothing else, do not write explanations. My first sentence is "istanbulu cok seviyom burada olmak cok guzel';
Response:
SELECT response from hackathon_project.english_translator WHERE text="Mera naam gautam hain. Main MindsDB ke hackathon main participate kiya hu.";
Model: position_interviewer
 CREATE MODEL hackathon_project.position_interviewer
 PREDICT response
 USING
     engine = 'openai_engine',
     model_name = 'gpt-4',
     api_key = 'Your-API-Key';
     prompt_template = 'I want you to act as an interviewer. I will be the candidate and you will ask me the interview questions for the position position. I want you to only reply as the interviewer. Do not write all the conservation at once. I want you to only do the interview with me. Ask me the questions and wait for my answers. Do not write explanations. Ask me the questions one by one like an interviewer does and wait for my answers. My first sentence is Hi';
Response:
SELECT response from hackathon_project.position_interviewer WHERE text="My name is Gautam.I'm MERN stack developer";

NOTE: Repeat this process for each role.
Use the Database:
Use the USE command to switch to the database where you created tables (as explained in the previous step).
USE chatbot_db;
Create a Roles Table:
Create a table to store information about the roles and associated MindsDB models.
  CREATE TABLE roles (
      id INT PRIMARY KEY,
      role_name VARCHAR(255),
      model_name VARCHAR(255)
  );
Insert Role Data:
Insert data into the
rolestable to associate each role with a specific MindsDB model.INSERT INTO roles (id, role_name, model_name) VALUES (1, 'ethereum_developer', 'ethereum_developer'), (2, 'position_interviewer', 'position_interviewer'), -- Add more roles as needed (3, 'english_translator', 'english_translator');
In this example, the roles table has columns for id, role_name, and model_name. You can customize the structure based on your specific requirements. This table will serve as a reference for mapping roles to MindsDB models.
Normal Frontend:
Custom Training Model with Role:
Create a React component where users can input their prompt and trigger the training process.
  import React, { useState } from 'react';
  import axios from 'axios';

  const CustomModelTraining = () => {
    const [prompt, setPrompt] = useState('');

    const handleTrainModel = async () => {
      try {
        // Make a POST request to train the model
        const response = await axios.post(
          'http://127.0.0.1:47334/v1/api/api/projects/{projectName}/models',
          { prompt }
        );

        // Handle the response (success or error)
        console.log('Model training response:', response.data);
      } catch (error) {
        console.error('Error training model:', error);
      }
    };

    return (
      <div>
        <h1>Custom Model Training</h1>
        <label>
          Enter your prompt:
          <input
            type="text"
            value={prompt}
            onChange={(e) => setPrompt(e.target.value)}
          />
        </label>
        <button onClick={handleTrainModel}>Train Model</button>
      </div>
    );
  };

  export default CustomModelTraining;
Create a Chat Component:
Create a new component (e.g.,
Chat.js) to manage the chat state and display responses.import React, { useState } from 'react'; import axios from 'axios'; const Chat = () => { const [messages, setMessages] = useState([]); const [inputMessage, setInputMessage] = useState(''); const handleSendMessage = async () => { // Add the user's message to the chat setMessages([...messages, { text: inputMessage, type: 'user' }]); try { // Make a POST request to MindsDB API for response const response = await axios.post( 'http://your-mindsdb-api-url/api/query', { query: inputMessage } ); // Add MindsDB's response to the chat setMessages([...messages, { text: response.data, type: 'mindsdb' }]); } catch (error) { console.error('Error fetching response from MindsDB:', error); } // Clear the input field setInputMessage(''); }; return ( <div> <div style={{ height: '300px', overflowY: 'scroll' }}> {messages.map((message, index) => ( <div key={index} className={message.type}> {message.text} </div> ))} </div> <div> <input type="text" value={inputMessage} onChange={(e) => setInputMessage(e.target.value)} /> <button onClick={handleSendMessage}>Send</button> </div> </div> ); }; export default Chat;
Make a GMAIL POST request:
import React, { useState } from 'react';
import axios from 'axios';

const App = () => {
  const [recipient, setRecipient] = useState('');
  const [emailSubject, setEmailSubject] = useState('');
  const [emailBody, setEmailBody] = useState('');

  const handleSendEmail = async () => {
    try {
      const response = await axios.post('http://localhost:3003/send-email', {
        to: recipient,
        subject: emailSubject,
        text: emailBody,
      });
      console.log(response.data);
    } catch (error) {
      console.error('Error sending email:', error);
    }
  };

  return (
    <div>
      <h1>Email Sender</h1>
      <label>
        Recipient:
        <input type="email" value={recipient} onChange={(e) => setRecipient(e.target.value)} />
      </label>
      <label>
        Subject:
        <input type="text" value={emailSubject} onChange={(e) => setEmailSubject(e.target.value)} />
      </label>
      <label>
        Body:
        <textarea value={emailBody} onChange={(e) => setEmailBody(e.target.value)} />
      </label>
      <button onClick={handleSendEmail}>Send Email</button>
    </div>
  );
};

export default App;
Implementing Gmail and Twitter API:
For integrating Gmail and Twitter functionalities, you'll need to handle authentication and API requests. Below is a simplified example for Gmail using react-gapi (Google API) and react-twitter-auth (Twitter API):
import React, { useState } from 'react';
import axios from 'axios';

const Chat = () => {
  const [response, setResponse] = useState('');
  const [emailModalOpen, setEmailModalOpen] = useState(false);

  const handleSendRequest = async () => {
    try {
      const mindsDBResponse = await axios.post('/api/endpoint', { query: 'userQuery' });
      setResponse(mindsDBResponse.data.response);
    } catch (error) {
      console.error('Error fetching MindsDB response:', error);
    }
  };

  const handleSendEmail = async () => {
    // Implement Gmail API integration
    // Use a backend endpoint to handle the Gmail API logic
    try {
      const gmailApiResponse = await axios.post('/api/send-email', {
        to: 'recipient@example.com',
        subject: 'Subject of the email',
        body: 'Body of the email',
      });

      if (gmailApiResponse.data.success) {
        console.log('Email sent successfully!');
      } else {
        console.error('Failed to send email:', gmailApiResponse.data.error);
      }
    } catch (error) {
      console.error('Error sending email:', error);
    }
  };

  const handleSendTweet = async () => {
    // Implement Twitter API logic here
    try {
      const twitterApiResponse = await axios.post('/api/send-tweet', {
        tweet: 'Tweet content',
      });

      if (twitterApiResponse.data.success) {
        console.log('Tweet sent successfully!');
      } else {
        console.error('Failed to send tweet:', twitterApiResponse.data.error);
      }
    } catch (error) {
      console.error('Error sending tweet:', error);
    }
  };

  return (
    <div>
      <div>{response}</div>
      <button onClick={handleSendRequest}>Send Request</button>
      <button onClick={handleSendEmail}>Send Email</button>
      <button onClick={handleSendTweet}>Send Tweet</button>

      {emailModalOpen && (
        <div className="modal">
          {/* Modal content for sending email */}
          {/* Include form fields, recipients, subject, body, etc. */}
          {/* Implement functionality to send email */}
        </div>
      )}
    </div>
  );
};

export default Chat;
import React, { useState } from 'react';
import { useGoogleLogin } from 'react-gapi';
import { useTwitterLogin } from 'react-twitter-auth';

const EmailTweetButtons = () => {
  const [emailModalOpen, setEmailModalOpen] = useState(false);
  const [toEmail, setToEmail] = useState('');
  const [subject, setSubject] = useState('');
  const [body, setBody] = useState('');

  const { signIn } = useGoogleLogin({
    onSuccess: () => {
      // Open modal to collect email details
      setEmailModalOpen(true);
    },
  });

  const { signIn: twitterSignIn } = useTwitterLogin({
    onSuccess: () => {
      // Implement Twitter API logic here
      postTweet();
    },
  });

  // Function to post a tweet using the Twitter API
  const postTweet = async () => {
    try {
      // Make an API call to your backend to post a tweet
      const response = await fetch('/api/post-tweet', {
        method: 'POST',
        headers: {
          'Content-Type': 'application/json',
        },
        // Include any necessary tweet data in the body
        body: JSON.stringify({
          tweetText: 'Your tweet content goes here.',
        }),
      });

      if (response.ok) {
        // Tweet posted successfully, you can handle success logic
        console.log('Tweet posted successfully!');
      } else {
        // Handle error response, show a message to the user
        console.error('Failed to post tweet. Please try again.');
      }
    } catch (error) {
      // Handle unexpected errors
      console.error('Error posting tweet:', error);
    }
  };

  const handleSendEmail = async () => {
    try {
      // Validate that required fields are not empty
      if (!toEmail || !subject || !body) {
        // Handle validation error, show a message to the user
        console.error('Please fill in all required fields.');
        return;
      }

      // Make an API call to your backend to send the email
      const response = await fetch('/api/send-email', {
        method: 'POST',
        headers: {
          'Content-Type': 'application/json',
        },
        body: JSON.stringify({
          toEmail,
          subject,
          body,
        }),
      });

      if (response.ok) {
        // Email sent successfully, you can handle success logic
        console.log('Email sent successfully!');
      } else {
        // Handle error response, show a message to the user
        console.error('Failed to send email. Please try again.');
      }
    } catch (error) {
      // Handle unexpected errors
      console.error('Error sending email:', error);
    } finally {
      // Close the modal after sending the email or handling errors
      setEmailModalOpen(false);
      handleModalClose();
    }
  };

  // Modal close function
  const handleModalClose = () => {
    // Reset email details when the modal is closed
    setToEmail('');
    setSubject('');
    setBody('');
    setEmailModalOpen(false);
  };

  return (
    <div>
      <button onClick={signIn}>Send Gmail</button>
      <button onClick={twitterSignIn}>Send Tweet</button>

      {emailModalOpen && (
        <div className="modal">
          {/* Modal content for sending email */}
          <label>To:</label>
          <input type="email" value={toEmail} onChange={(e) => setToEmail(e.target.value)} />

          <label>Subject:</label>
          <input type="text" value={subject} onChange={(e) => setSubject(e.target.value)} />

          <label>Body:</label>
          <textarea value={body} onChange={(e) => setBody(e.target.value)} />

          <button onClick={handleSendEmail}>Send Email</button>
        </div>
      )}
    </div>
  );
};

export default EmailTweetButtons;
Outcomes:
1. Install MindsDB:
Goal: Set up MindsDB on the system or choose a deployment option.
Outcome: MindsDB successfully installed, ready for further configuration.
2. Create Databases:
Goal: Utilize MindsDB to create databases and tables for storing training data and model information.
Outcome: Databases and tables created, providing a structured environment for data and model management.
3. Define Roles:
Goal: Identify and define various roles for the chatbot (e.g., chef, comedian, motivational coach).
Outcome: Roles defined, preparing for role-specific model training.
4. Train Custom Models:
Goal: Enable users to train their own models using MindsDB based on specified prompts.
Outcome: Users can successfully train custom models tailored to their preferences.
5. Display Response:
Goal: Retrieve responses from MindsDB and display them in the chat interface.
Outcome: Seamless integration allowing users to interact with role-specific responses.
6. Send Email (Gmail API):
Goal: Implement Gmail API to send emails with generated responses.
Outcome: Users can send responses via email directly from the chat interface using Gmail API.
7. Share on Twitter (Twitter API):
Goal: Use Twitter API to post generated responses on the user's Twitter account.
Outcome: Integration with Twitter API allowing users to share responses on Twitter.
Conclusion:
I successfully crafted a multi-faceted chatbot powered by MindsDB, designed to take on diverse roles, from a chef and comedian to a motivational coach. Users can select a role, and the chatbot, driven by MindsDB-trained models, delivers tailored responses.
The journey covered the entire project lifecycle, starting with the installation of MindsDB and the creation of databases and tables to store training data and model information. Defining roles, training custom models, and integrating APIs for email and Twitter interactions were essential steps. #mindsdb #mindsdbhackathon